VIDEO ART
1) Visit the website ubuweb and explore the many experimental films and videos available on this site: http://www.ubu.com/film/
Choose a video/film of your liking. Shoot and edit your own version of the chosen video/film preserving the soundtrack from the original source to be added to your video creation. This is an interpretive experiment. Be creative in how you approach this project! You can attempt to recreate or copy the point of view, camera angles, timing, subject matter and such in your original or creatively re-interpret. Your video creation should somehow reflect your chosen work. There are many hundreds of choices on this site - take some time to explore these many varied historical and contemporary works! (You cannot pick Fatboy Slim)
The minimum length of your video should be 45 seconds with a minimum of three cuts.
In our critique we will be viewing your original source video and your reenactment, please be sure BOTH works are embedded blog post as well as your Artist Statement!
Equipment and techniques: You may use anything from a cell phone video camera, laptop webcam to a high end HD camcorder. This is up to you! I recommend you use Adobe Premiere of Final Cut Pro to edit your work after capturing the audio with Snapz Pro X (This program is only available in the lab)
Your video is due, posted to your blog (embed through Youtube or Vimeo) by the start of class time Monday, March 11th.
2) Read "Chapter 2 Video Art" for next week, Monday, March 4th and post two questions on your blog prior to class time. Research artists mentioned in the reading - find videos of their work where possible online as this will greatly enhance your understanding and appreciation of their works! Bring your camera and other supplies as you will have time to work on your projects in the lab.
Nam June Paik
Matthew Barney
Snapz Pro X and Adobe Premiere

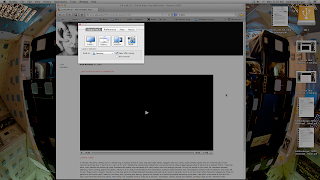
Once you have chosen you video, open up the video player in your web browser.
Open Snapz Pro X (usually CMD-SHIFT-5) and select the Movie button.
Move the selection box over you video. (It doesn't have to be perfect as we will be deleting the video track later.)
Make sure the "Capture Mac Audio" button is selected.
Open Premiere and Click "New Project
The New Project interface will open. Name your file and choose the location in which you want to save your file. (Mine will look a bit different because I am using older software, but the process is the same.)
Next, you are given the "New Sequence" options. You want to choose "DV-NTSC" (Digital-Video National Television System Committee) as either Standard48kHz (4:3) or Widescreen48kHz (16:9), whichever one you prefer. The 48kHz is the audio sampling rate.
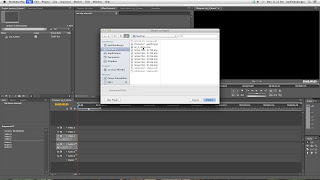
Go to File > Import, and select your file.
This will import your file to the project window. Drag you file to the timeline and you will separate video and audio tracks. This is how you import your own video to the project window as well.
To delete the original video track, RIGHT click on the video track in the timeline and select "UNLINK."
Now all you have to do is hit delete and the video is gone. Drag your new video to the timeline and use the same process to remove the audio.
After you video is put together, go to File > Export > Media.
This will bring up your CODEC interface. Make sure your settings match this image completely, then hit OK.
Use H.264 (MPEG4), Quicktime, or MPEG2 as your CODED/Compressor so it doesn't take 9 years to load to YouTube or Vimeo.
This will bring up Adobe Media Encoder. This program allows you to make any final changes to your video settings before rendering you file. If you followed the directions you won't have to make any changes except where you want the file to render to (as indicated in the image.) Click "Save Queue" and CONGRATULATIONS, you are a Video Artist!!!


No comments:
Post a Comment